Shopping Cart - 0 Item
You have no items in your shopping cart.
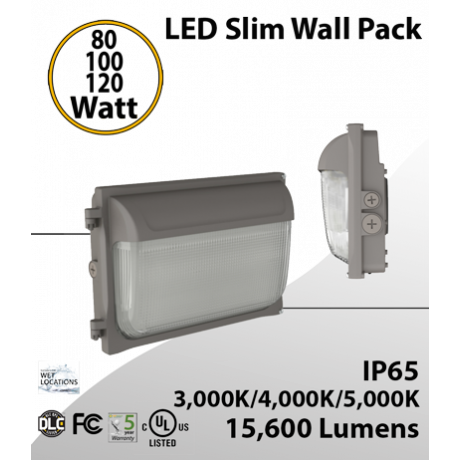
Product Description: Slim LED Wall Pack for Commercial Lighting Solutions
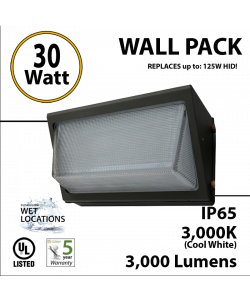
Revolutionize commercial lighting with our Slim LED Wall Pack designed to meet the needs of electricians and electrical contractors. Engineered for durability and versatility, this wall pack offers unparalleled performance in various applications.
Construction and Electrical Specifications
Crafted from heavy die-cast aluminum alloy with a bronze powder-coated finish, ensuring robustness and longevity. Compatible with 120-277V input, operating efficiently in temperatures ranging from -20°C to 45°C.
Optical System and Mounting
Equipped with high brightness luminleds 2835 chips and glass optics, delivering uniform illumination with a wide 120° beam angle. Features a slim design for a discreet appearance on buildings, facilitating effortless wall mounting with a backside plate for seamless installation.
Customization and Control
Built-in CCT&Power tunable Switch and Photocell options provide flexibility and customization according to specific lighting requirements. Additionally, enjoy the convenience of 0-10V dimming for enhanced control over lighting levels.
Applications
- Warehouses: Illuminate large storage spaces with uniform and bright light.
- Stadiums: Provide optimal visibility for sporting events and gatherings.
- Factories: Ensure safety and productivity with well-lit work environments.
- Parking Lots: Enhance security and visibility for vehicles and pedestrians.
- Supermarkets: Create inviting and well-lit shopping experiences for customers.
- Shopping Malls: Illuminate corridors and common areas for safety and ambiance.
- Logistic Centers: Improve operational efficiency with well-lit loading docks and storage areas.
- Auto Dealerships: Showcase vehicles with vibrant and attractive lighting.
Advantages and Highlights
- Durable Construction: Die-cast aluminum housing and glass lens ensure reliability and longevity.
- Versatile Applications: Suitable for a wide range of commercial settings, catering to diverse lighting needs.
- Energy Efficiency: High efficiency LEDs and customizable features contribute to energy savings.
- Easy Installation: Slim design and backside plate facilitate quick and hassle-free mounting.
- Customization Options: Built-in switches and photocell provide flexibility for tailored lighting solutions.
- Enhanced Control: 0-10V dimming capability allows precise control over light output.
Our Slim LED Wall Pack offers electricians and electrical contractors a reliable and efficient lighting solution for various commercial applications. With its durable construction, customizable features, and easy installation, it's the ideal choice for illuminating warehouses, stadiums, factories, parking lots, supermarkets, shopping malls, logistic centers, and auto dealerships, ensuring optimal visibility and safety while maximizing energy efficiency.
We invite you to browse our selection and do not hesitate to chat with us or call us to 844-533-7230 for any question regarding our LED products.
| No |

MEDIUM WALL PACK INSTALLATION GUIDE
(WTM-TZP-70600-4Y/5Y)
PLEASE READ ALL INSTRUCTIONS BEFORE ATTEMPTING INSTALLATION 1. To avoid electric shock, disconnect power at source prior to installation. 1. Junction box Mounting 1. Loosen screws and remove the front lens set carefully from the back plate.
 2. Drill appropriate knockouts (B) for wiring, the fixture supports standard 3 1/4' and 4" Junction box.
 3. Attach the back plate on the wall use the supplied gaskets for a weather tight seal
 4. Finish wiring (Black for Line, White for Neutral and Green/Yellow wire for Ground).
 5. Replace the lens on the hinges, make connections and close the lens set then tighten the screws.
 2. Conduit Mounting 1. Loosen screws and remove the front lens set carefully from the back plate.(See step 1 above)
2. Remove 1/2 'plug from where you intend to feed conduit  3. Drilling out the holes (C) to secure it on the wall with choosing proper screws.
4. Finish wiring (Black for line, White for neutral and Green/Yellow for ground). (See step 4 above)  5. Replace the lens on the hinges, make connections and close the lens set and tighten the screws to fasten the lens set to the back plate.
 Save the environment, your children and the planet
500 North Dixie Hwy, #8, Hollywood, FL 33020 – (844).533.7230
[email protected] – www.ledradiant.com 
5 YEAR WARRANTY POLICY
For Commercial LED Lamps and fixtures
• This warranty policy is valid only for products sold in The United States of America.
• Products have been purchased directly from a LEDRadiant (sales) organization. • Proof of purchase is available for inspection by LEDRadiant. • Products have been properly installed and operated in accordance with the manufacturer’s instructions. • More than 10% of the LED chips are not properly working. • A LEDRadiant representative will have access to the defective Products. • If the Products or other parts become suspect, the representative shall have the right to invite other manufacturers’ representatives to evaluate the lighting systems. • Shipping and Labor costs for installation of the Products are not covered under this warranty. This warranty is valid for order number: By LEDRadiant Save the environment, your children and the planet
500 North Dixie Hwy, #8, Hollywood, FL 33020 – (844).533.7230
[email protected] – www.ledradiant.com |
Customer Reviews
- awesome Review by Julian
-
Rate Great quality! The adjustable wattage and color temperature are perfect for different needs, and the built-in photocell is handy for automatic lighting. It’s durable and efficient.(Posted on 8/21/2024) - nice fixture Review by Mark
-
Rate I purchased the Commercial LED Wall Pack for a warehouse exterior lighting project. The wattage selectable feature is incredibly useful because it allowed me to choose the right brightness for different areas without buying multiple products. It's solidly built and the installation was straightforward.(Posted on 4/24/2024) - good Review by Amador
-
Rate As someone focused on energy efficiency, finding lighting solutions that optimize performance while minimizing operational costs is crucial.(Posted on 4/17/2024) - Very good! Review by Matteo
-
Rate I highly recommend the Slim LED Wall Pack for anyone seeking an efficient and versatile lighting solution for commercial applications.(Posted on 2/11/2024) - Excellent!! Review by Patt
-
Rate The Slim LED Wall Pack is a stellar addition to any outdoor commercial lighting project. I recently installed the 120W variant for illuminating the exterior of a warehouse, and I couldn't be happier with the results.(Posted on 1/7/2024)
Write Your Own Review
- Product Description
-
Product Description: Slim LED Wall Pack for Commercial Lighting Solutions
Revolutionize commercial lighting with our Slim LED Wall Pack designed to meet the needs of electricians and electrical contractors. Engineered for durability and versatility, this wall pack offers unparalleled performance in various applications.
Construction and Electrical Specifications
Crafted from heavy die-cast aluminum alloy with a bronze powder-coated finish, ensuring robustness and longevity. Compatible with 120-277V input, operating efficiently in temperatures ranging from -20°C to 45°C.
Optical System and Mounting
Equipped with high brightness luminleds 2835 chips and glass optics, delivering uniform illumination with a wide 120° beam angle. Features a slim design for a discreet appearance on buildings, facilitating effortless wall mounting with a backside plate for seamless installation.
Customization and Control
Built-in CCT&Power tunable Switch and Photocell options provide flexibility and customization according to specific lighting requirements. Additionally, enjoy the convenience of 0-10V dimming for enhanced control over lighting levels.
Applications
- Warehouses: Illuminate large storage spaces with uniform and bright light.
- Stadiums: Provide optimal visibility for sporting events and gatherings.
- Factories: Ensure safety and productivity with well-lit work environments.
- Parking Lots: Enhance security and visibility for vehicles and pedestrians.
- Supermarkets: Create inviting and well-lit shopping experiences for customers.
- Shopping Malls: Illuminate corridors and common areas for safety and ambiance.
- Logistic Centers: Improve operational efficiency with well-lit loading docks and storage areas.
- Auto Dealerships: Showcase vehicles with vibrant and attractive lighting.
Advantages and Highlights
- Durable Construction: Die-cast aluminum housing and glass lens ensure reliability and longevity.
- Versatile Applications: Suitable for a wide range of commercial settings, catering to diverse lighting needs.
- Energy Efficiency: High efficiency LEDs and customizable features contribute to energy savings.
- Easy Installation: Slim design and backside plate facilitate quick and hassle-free mounting.
- Customization Options: Built-in switches and photocell provide flexibility for tailored lighting solutions.
- Enhanced Control: 0-10V dimming capability allows precise control over light output.
Our Slim LED Wall Pack offers electricians and electrical contractors a reliable and efficient lighting solution for various commercial applications. With its durable construction, customizable features, and easy installation, it's the ideal choice for illuminating warehouses, stadiums, factories, parking lots, supermarkets, shopping malls, logistic centers, and auto dealerships, ensuring optimal visibility and safety while maximizing energy efficiency.
We invite you to browse our selection and do not hesitate to chat with us or call us to 844-533-7230 for any question regarding our LED products.
- Additional Information
-
No  MEDIUM WALL PACK INSTALLATION GUIDE(WTM-TZP-70600-4Y/5Y)
PLEASE READ ALL INSTRUCTIONS BEFORE ATTEMPTING INSTALLATION
1. To avoid electric shock, disconnect power at source prior to installation.
2. The installation should be performed by qualified electricians or lighting technicians.
3. Before conducing any installation, maintenance, or removal, disable all power to the luminaries and wait until the fixture cool down.
4. Do not touch the fixture while it is in service.
5. If there is any problem with the fixture, DO turn off power, and DO NOT attempt repair unless you are a qualified technician or the customer service member.
1. Junction box Mounting
1. Loosen screws and remove the front lens set carefully from the back plate.
 2. Drill appropriate knockouts (B) for wiring, the fixture supports standard 3 1/4' and 4" Junction box.
 3. Attach the back plate on the wall use the supplied gaskets for a weather tight seal
 4. Finish wiring (Black for Line, White for Neutral and Green/Yellow wire for Ground).
 5. Replace the lens on the hinges, make connections and close the lens set then tighten the screws.

2. Conduit Mounting
1. Loosen screws and remove the front lens set carefully from the back plate.(See step 1 above)
2. Remove 1/2 'plug from where you intend to feed conduit
 3. Drilling out the holes (C) to secure it on the wall with choosing proper screws.
4. Finish wiring (Black for line, White for neutral and Green/Yellow for ground). (See step 4 above)
 5. Replace the lens on the hinges, make connections and close the lens set and tighten the screws to fasten the lens set to the back plate.

Save the environment, your children and the planet500 North Dixie Hwy, #8, Hollywood, FL 33020 – (844).533.7230
[email protected] – www.ledradiant.com
 5 YEAR WARRANTY POLICYFor Commercial LED Lamps and fixtures
This document sets forth the warranty policy of the LEDRadiant organization (‘LEDRadiant’) from which you (‘Purchaser’) purchase your commercial LED Lamps .
This policy is applicable only to LEDRadiant (‘Products’) described in the Warranty Certificate extended to the Purchaser along with the correlated invoice or the Certificate in the website page for the product being questioned.
This warranty policy is subject to the provisions as set forth herein and is subject to the terms and conditions as attached to this document (‘Warranty Terms and Conditions’) .
This warranty policy only applies if referred to in a sales agreement between LEDRadiant and the Purchaser and it will replace the standard warranty clause provided in the LEDRadiant general terms and conditions of sale.
Warranty period
5 Year. The warranty period starts on the date the products are delivered.
By default, purchaser receives above mentioned ‘standard warranty’.
On request, an ‘extended warranty’ or ‘customized project warranty’ can be agreed upon after evaluation of the specific application conditions. Extended warranty cost will be calculated and applied to the order.
Purchaser shall not rely upon any other information or documentation.
Within the warranty period, LEDRadiant will replace any defective bulb or fixture with equal or updated working model in the same conditions or better.
Summary Warranty Terms and Conditions (non-exhaustive)• This warranty policy is valid only for products sold in The United States of America.
• Products have been purchased directly from a LEDRadiant (sales) organization.
• Proof of purchase is available for inspection by LEDRadiant.
• Products have been properly installed and operated in accordance with the manufacturer’s instructions.
• More than 10% of the LED chips are not properly working.
• A LEDRadiant representative will have access to the defective Products.
• If the Products or other parts become suspect, the representative shall have the right to invite other manufacturers’ representatives to evaluate the lighting systems.
• Shipping and Labor costs for installation of the Products are not covered under this warranty.
This warranty is valid for order number:
By LEDRadiant
Save the environment, your children and the planet500 North Dixie Hwy, #8, Hollywood, FL 33020 – (844).533.7230
[email protected] – www.ledradiant.com - Product Tags
- Reviews
-
Customer Reviews
- awesome Review by Julian
-
Rate Great quality! The adjustable wattage and color temperature are perfect for different needs, and the built-in photocell is handy for automatic lighting. It’s durable and efficient.(Posted on 8/21/2024) - nice fixture Review by Mark
-
Rate I purchased the Commercial LED Wall Pack for a warehouse exterior lighting project. The wattage selectable feature is incredibly useful because it allowed me to choose the right brightness for different areas without buying multiple products. It's solidly built and the installation was straightforward.(Posted on 4/24/2024) - good Review by Amador
-
Rate As someone focused on energy efficiency, finding lighting solutions that optimize performance while minimizing operational costs is crucial.(Posted on 4/17/2024) - Very good! Review by Matteo
-
Rate I highly recommend the Slim LED Wall Pack for anyone seeking an efficient and versatile lighting solution for commercial applications.(Posted on 2/11/2024) - Excellent!! Review by Patt
-
Rate The Slim LED Wall Pack is a stellar addition to any outdoor commercial lighting project. I recently installed the 120W variant for illuminating the exterior of a warehouse, and I couldn't be happier with the results.(Posted on 1/7/2024)
Write Your Own Review
- FAQ

